Wednesday, August 22, 2012

Inov-8 Trailroc 245 Review

I'm a huge fan of Inov-8 shoes, particularly the f-lite 195 and Roclite 285 shoes. The f-lite 195s have been my go-to trail and mountain racing shoes for over a year now, and the Roclite 285s are fast becoming my primary trail and mountain training shoe. I've also raced in the Roclite 285s and X-Talon 190s several times each, and they both perform very well for racing in some of the tougher trail conditions that the f-lite 195s would struggle with. When I heard about Inov-8's new Trailroc line earlier this year, I was eager to see what they would bring to the table and have been anticipating their release ever since.

I spent a week testing the Trailroc 245s in Alaska over a wide variety of trail types and conditions. In addition to assessing the overall fit, feel, utility, and durability of the shoe, my attention in testing was focused on whether this would be an appropriate racing shoe for some of the longer, rougher trail races that I do where more grip and rock protection may be needed. In the past I have used the Roclite 285 for this purpose, but if the Trailroc 245 lives up to my hopes of being a more suitable racing shoe - lighter, lower to the ground, and more comfortable over long runs - I would gladly use it in some of the races where the lighter range of shoes does not provide the protection needed.
My review of the Inov-8 Trailroc 255s with focus on their use as a mountain training shoe can be found here: Inov-8 Trailroc 255 Review

Stock Photo of the Trailroc 245s - photo stolen from the Internet.
The Trailroc 245 shoes initially sparked my interest because they appeared to be a more rugged trail shoe built on many of the same principles as the f-lite 195 that I've been a huge fan of and have used extensively for both trail and road races. Some extra weight is sacrificed for the addition of a fully lugged outsole designed for rough trails, a rock plate for foot protection, and a slightly beefier midsole construction. These features all play to the advantage of the Trailroc 245 for being capable of handling poor and variable trail conditions better than the f-lite 195 or its' Inov-8 cousins, the f-lite 230 and X-Talon 190. The use of the anatomic last in this shoe also gives it potential for better comfort over a higher number of miles than the performance last used in the above mentioned shoes, and the 1-Arrow midole design means that the shoe retains the low heel to toe drop found in the f-lite 195 and X-Talon 190.

During my time in Alaska I put approximately 70 miles on the Trailroc 245s over a wide variety of trail conditions: dry hardpack, loose gravel and scree, sharp talus, slick packed mud, deep boggy mud, wet rocks and roots, packed snow, snow-dusted rock, wet grassy slopes, and standing water. In almost all of these conditions, the shoes performed admirably. In only a few fairly isolated cases would I have much preferred a different type of shoe to handle the terrain.

Before I get into the evaluation of the shoes over the different terrain types, it's worth noting that the sizing of the Trailroc 245 seems nearly identical to that of the other Inov-8 models I've used (f-lite 195, f-lite 230, X-Talon 190, Roclite 285, Road-X Lite 155, and Roclite 312 GTX). In my review of the Trailroc 255 I noted that the sizing felt slightly smaller than these other models, but this is not the case with the 245.

Below, my Trailroc 245s are shown ready to embark on their first run through the rainy expanses of the grassy fields and mud flats of the Alaska coast.


The advertising I've seen for the shoes seems to indicate that they were designed with more "American" trail conditions in mind than many of Inov-8's other models which have their roots in the terrains commonly found in fell running. Based on my experience, the shoes performed the best on both packed and loose dirt, dry and wet rocks, dry and wet grass, and some packed mud. The shoes also performed exceptionally well on uneven and abrasive terrain where the thick rubber lugs, rock plate, and midsole cushioning worked together to provide a huge amount of protection in a comparatively lightweight shoe. The outsoles don't have the level of grip required to truly control some terrains such as loose mud and snow as well as the X-Talon, Bare-Grip or Mudclaw models, but they act as a good intermediate to handle many of the variable conditions well.

The photo below shows the print of a bear next to the print of my Trailroc 245. The bear could probably squeeze into a size 6, but it looks like he would need some extended widths.


The Tri-C outsoles gripped most surfaces well, and I never had problems with the forefoot or heel area lugs slipping on wet rock or grass. The only times my feet slipped were when I attempted to use the lugs under the arch area of the shoe to step onto an elevated root or rock. The lugs had a tendency to slip in these circumstances, and I don't know whether it is the rubber compound used in that area of the outsole or the way that my weight was distributed while placing weight on this area of the shoe. I don't consider this to be a big deal since I don't foresee ever truly needing to rely on the arch area of the outsole for grip anyway, and had questioned why there were lugs in this area of the shoe to begin with.

When running through standing water and streams running down the middle of the rocky trails during some of the heavier rain that I experienced, the shoes seemed to drain and dry just as well as the f-lite or X-Talon models. In comparison to other brands of trail shoes, I consider these to be superior to most in terms of how well they drain.

The picture below shows an example of some of the rainy and wet conditions the shoes experienced. The creek running through the foreground of the picture is actually the trail.


The overall feel of the shoes was very impressive, with the anatomic last providing a very comfortable outline for the foot box. Although I have not done any runs longer than 20 miles in these shoes to date, I have no reason to doubt that they would remain comfortable over longer distances. As I mentioned before, the padding in the midsole and the protection of the rock plate worked very well to keep the potential for foot bruising to a minimum while still providing for a decent level of ground feel and flexibility. The light weight relative to some similar competing shoe models is truly impressive considering the amount of underfoot structure that is included.

While I was in Alaska, I ran the Lost Lake Run, which is a ~15.5 mile trail race through the mountains of the Kenai Peninsula near Seward. I'll cover the details of the race in a separate report, but in leading up to the race I was unsure whether I would prefer to run this race in the Trailroc 245s or the X-Talon 190s. In the end, I chose to race in the X-Talon 190s and feel that I made the right decision simply due to the weight reduction granted in those shoes. In the future, I plan to use the Trailroc 245 for some marathon and longer distance trail races, especially on courses with rough and variable terrain.

Below is the "after" picture of the shoes with the remnants of a week in Alaska all over them.


Monday, August 13, 2012

Adventures on "America's Sinai" - Mount of the Holy Cross

I've always been intrigued by the history of the mountains in Colorado and I enjoy reading the stories of the early explorers and other folklore attached to the mountains. One of the most storied mountains in Colorado is Mount of the Holy Cross. Today this mountain is not as widely known as it once was, and is visited by relatively few people due to its' relative lack of visibility and accessibility from populated areas.

The first recorded ascent of the mountain occurred in 1873 when F.V. Hayden led his survey party up the peak. William Henry Jackson, the famous western photographer, accompanied the survey party and photographed the peak. Jackson's photographs of the northeast face of the peak, with its' distinctive gully carved into the middle of the face and the prominent ledge intersecting the gully high on the peak, would soon become famous.


Soon after the photographs were published, the painter Thomas Moran went to the area and produced a painting of what he felt was a more appropriate artistic interpretation of the scene.


Moran used scenery from three different vantage points of the mountain itself, a high waterfall in the valley below, and the creek in the foreground, then added in some extra mountains for symmetry and whispy clouds for the effect of grandeur in his construction of the painting. The stories and philosophies generated by the fame of this mountain with a cross carved into it further perpetuated the already popular idea of manifest destiny, and that the cross in the mountain was a sign of God's blessing on the settlement of the west. I could spend a very long time commenting on the line of thinking that leads people to conclusions such as this, but I'll refrain. Suffice it to say that it's unfortunate how little people generally understand about the basis for their beliefs.

The popular Halo Ridge route on Mount of the Holy Cross traverses the high ridgeline encircling the basin below the east face of the peak and passes near the location where Jackson first photographed the peak.

I set out from Denver Friday afternoon and made my first stop in Idaho Springs where I consumed a pizza that was recommended to feed 2-3 people. This seemed like a great decision at the time, but would cause some serious discomfort later. After leaving Idaho Springs I drove to the top of Vail Pass and took the Shrine Pass road to the high area around Battle Mountain. I found a good camping spot off of a spur road which also happened to be right next to an intersection with the Elk Pass/Two Elk Creek trail. I decided to go for a short run before setting up my camp, so I set off with high hopes of the great views I had heard were visible from this trail.

I didn't have to run long to realize that I was feeling generally sluggish and that the mound of pizza inside me was going to be causing me some trouble. I struggled through to the top of the ridge and admired the views of the Gore Range mountains to the north.


Storms were building to the west and south, and the rain hit me right before I started making the descent toward Two Elk Pass. At this point I decided I'd rather not risk getting stuck in any serious weather on the wrong side of the mountain, so I turned back toward my campsite.

I was lulled to sleep that night by the sound of the rain falling on the tarp above me, the hissing and crackling of the hot coals in my dying camp fire, and the periodic outbursts of nearby artillery fire. It was a mixed bag of serenity and sheer terror. After waking up the next morning I quickly broke down my camp and drove toward Minturn, then up to the Halfmoon trailhead for Mount of the Holy Cross. I set off at a good steady pace up the Fall Creek trail and passed by a couple of parties who looked like they were set to backpack further up Fall Creek. I passed one pair of guys who were loaded down with large packs, equipped with fishing gear, archery gear, and were accompanied by their Pomeranian carrying a pack that had to be twice its' own weight, which was impressive. I was quickly above treeline looking down into the valleys below.


The eastern slopes of Notch Mountain and the Halo Ridge made for a good quick climb with a well built trail switchbacking up the hillside.


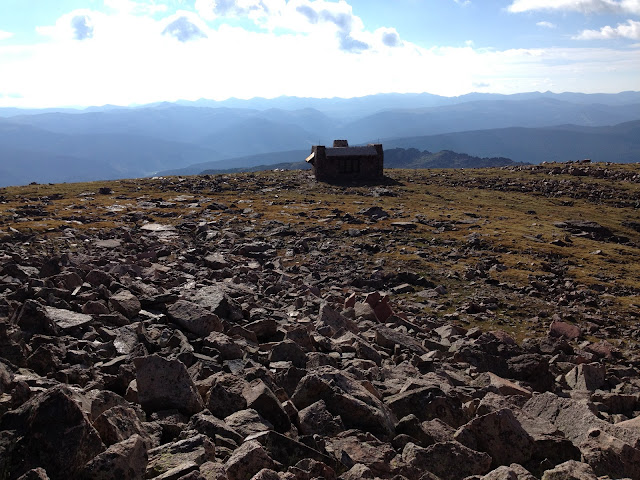
I felt great when I reached the Notch Mountain shelter and took some time to soak in the views surrounding this historic site.


As I started making my way along the ridgeline traversing across the sub-peaks, the views of Holy Cross, the Bowl of Tears below it, and the East Cross Creek valley opened up and provided some spectacular sights.


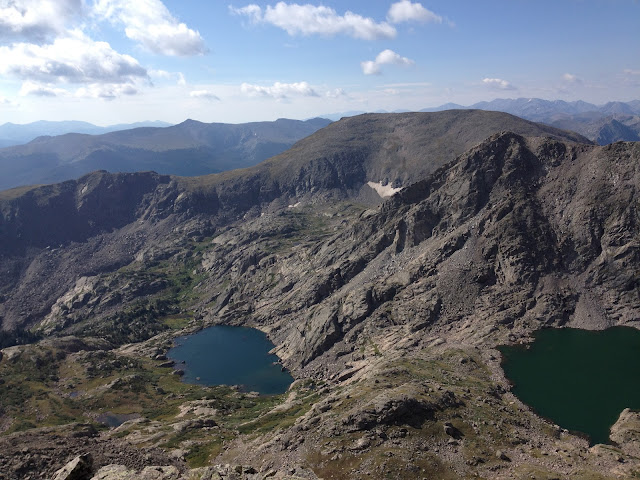
To the south, the Tuhare Lakes valley looked nice and peaceful.


From this point on the wind started to kick up and the clouds began forming more rapidly, but there was no evidence that any storms were brewing, which is good because there were not any options for bailing off the ridge at that point. After summiting Mount of the Holy Cross, I began to encounter the first people I'd come across in quite a while making their way up and down the standard route on the peak. I continued on, descending the mountain to East Cross Creek, then making the climb up to Halfmoon Pass before descending back to the trailhead. At Halfmoon Pass I met the little guy pictured below, who I named Hackey Sack.


I named him Hackey Sack because that's the game that we played together.

After returning to the trailhead I went through my usual routine of cooling off in the creek. As I was lounging in the creek I heard a child start screaming behind me. I stood up and turned around quickly, which was probably the wrong thing to do because it seemed to only provoke more distress among the family standing on the bridge over the creek nearby. As far as I can tell, the various members of this family had noticed me sitting in the creek and decided to get freaked out over the fact that they thought I was either (a) naked, although I was still wearing my running shorts, (b) a bear, or (c) a crazy homeless person. I'm still not sure what exactly happened, but I wasn't interested in sticking around and trying to ease the neurosis of these people.

Halo ridge turned out to be a lot of fun, although tiring from all of the boulder hopping along the ridge. With the crazy history that the mountain carries, I feel fortunate to be able to climb it in a wilderness setting without dealing with tourist roads to the top and gift shops on the summit, as is the case with some of the other more historic mountains in the state.

Friday, August 10, 2012

Inov-8 Trailroc 255 Review

Introduction

I'm a huge fan of Inov-8 shoes, particularly the f-lite 195 and Roclite 285 shoes. The f-lite 195s have been my go-to trail and mountain racing shoes for over a year now, and the Roclite 285s are fast becoming my primary trail and mountain training shoe. I've also raced in the Roclite 285s and X-Talon 190s several times each, and they both perform very well for racing in some of the tougher trail conditions that the f-lite 195s would struggle with. When I heard about Inov-8's new Trailroc line earlier this year, I was eager to see what they would bring to the table and have been anticipating their release ever since.

I will be reviewing the Trailroc 255 and 245 in separate posts, with this one being dedicated to the 255. My review of the Trailroc 245 can be found here: Inov-8 Trailroc 245 Review

Part 1: Trailroc 255 First Impressions


The most obvious changes to this shoe from other current Inov-8 trail models are the new tread, mesh, and overlay designs. I ordered the shoes in a US men's size 11, UK size 10, which is the size I wear in every other Inov-8 shoe model. As it turns out, the pair that I got are about 1/2 size smaller than what I would expect based on my past history with the shoes. They were not too small, but I didn't have as much gap in the toes as I might have liked. If I buy more of this shoe, I'll consider sizing up 1/2 size.

Let me back up and explain why I was so eager to receive the 255 model and what the basis is that I'll be comparing it to when trying it out. When I first started looking at the Trailroc line, I noticed that the 255 model looked suspiciously similar in design and technical specs to the Roclite 285. My thinking is that if the 255 is a good seller, Inov-8 may do away with the Roclite 285 since it is sort of an outlier in the Roclite line of shoes anyway. If this happens, I want to make sure that I either love the 255 enough to be happy making the transition to use it as a regular mountain trainer, or if I don't love the 255 I can be prepared to stockpile several pairs of the 285s if and when they're discontinued in order to hold me over until I find an acceptable alternative.

With that said, here's a look of comparison between the Trailroc 255 and the Roclite 285.


As promised by the specs, the shoes appear quite similar. The toe box of the 255 is wider than that of the 285 due to the anatomical last used by Inov-8 for this line. The 255 also rides a decent bit higher (specs say 4 mm) than the 285, and this is noticeable when running on hard ground. The mesh used on the 255 appears to be lighter and more closed than the mesh on the 285s. The feel of the mesh on the 255 suggests that it may not hold up as well to abrasion as the 285 does, but this is yet to be seen.

Both shoes use the 2 Arrow Shoc-Zone midsole design which is supposed to result in a 6 mm heel to toe drop. I have never felt that the 285 has as much drop as the other 2 Arrow designs that I've used, and this case is no exception. When I put the 255 on one foot and the 285 on the other and ran around in them, the drop in the 255 felt noticeably greater than in the 285. I put on one of my f-lite 230s (also a 2 Arrow shoe) opposite the 255 and the drop felt the same in both shoes.

The protection on the toe and upper of the 255 is something that I'm very interested in testing out to determine how it performs. In several of the Inov-8 trail shoes that I use regularly, namely the f-lite 195, f-lite 230, and X-Talon 190, the uppers are not reinforced save for the area immediately around the toe box. This results in the uppers wearing out and holes forming, usually in the forefoot flex area on either side of the shoe, as the shoes are subjected to abrasion from the outside, weathering of the mesh, and fatigue on the mesh due to forefoot flexing. I have not had this happen with the Roclite 285s because they include an extended tough protective layer further down the forefoot area of the shoe. As you can see in the pictures above, the protective material applied to the 255 supplies even more coverage toward the back of the foot than on the 285, however the material used is slightly different from that on the 285. I will be paying close attention to how this material holds up to wear.

The outsole of the Trailroc line utilizes three different grades of rubber in different areas of the tread for optimal wear. The tread itself is very similar to that of the Roclite line, however there are more lugs under the arch area of the foot. Whether these extra lugs will prove useful is yet to be seen but I would normally not consider this many lugs to be necessary.

Although the weight of the shoes is advertised by Inov-8 as 255 grams (9.0 oz) for the Trailroc 255, and 285 grams (10.0 oz) for the Roclite 285, the measurements by Running Warehouse are just about the opposite - 9.9 oz for the Trailroc 255 and 9.0 oz for the Roclite 285. Because I don't have a scale that measures this precisely, I can't confirm any of these numbers, but the weight in hand of the two shoes feels close enough that I can't tell a difference.

I will not go into the rest of the technical specifications of the shoe in detail. If you're interested in reading more about the specs, the Inov-8 website lists some additional technical details. Click here for the details on the Inov-8 website.

Part 2: Trailroc 255 Field Test Review


Friday evening I took a warm up run before the true test, which would occur Saturday morning. For this warm up I decided to do a side by side comparison of the Trailroc 255 and Roclite 285.


During the 5 mile side by side run, I confirmed my initial observation that the 255 does sit a little higher and has a slightly higher heel to toe drop than the 285. The 255 also has some extra cushioning that makes it a little softer of a ride than the 285. When testing out the grip while running downhill, the 255 seemed to grip the trails just as well as the 285 with no notable differences in stability.

Saturday morning I put the Trailroc 255s to the test along the Halo Ridge route on Mount of the Holy Cross. The terrain on the route consisted of several miles of smooth trails, several miles of rocky trails, lots of miles of off-trail scrambling across rough boulder fields, and some high alpine meadows. The many miles of scrambling across a sea of sharp talus blocks over the high ridge lines were a real test of the durability of the shoes, and of my lower leg stabilizing muscles.


I will caveat this to say that I would not expect for very many running shoes to truly be capable of holding up over a route such as this one. Extended scrambling through sharp rocks has a tendency to rip even very well built trail running shoes to shreds. That being said, the 255s held up very well to the punishment. In particular, the extended toe rand cover that provides protection to the uppers of the shoe held up very nicely despite taking a huge beating throughout the day. The one durability issue that I noted is that the toe edge of the outsole on both shoes began delaminating from the upper material. I don't consider this a big deal because I've had this happen with lots of different shoes and it's a $0.50 fix with some good two part epoxy. Usually I only have to make this repair once and it's never a problem again.


As Adam noted in his comment below, the extended toe rand material on the 255 has the capacity to cause some drainage issues, and this is something that I wanted to pay close attention to as I was testing out the shoes. I'm glad that Adam brought this up because I had forgotten to mention before that quick water drainage is the one slight problem I've had with the Roclite 285 that I was hoping would be improved with this shoe. When I crossed East Cross Creek near the end of my route on Saturday, I made sure to fully submerge the shoes and get them nice and soaked so I could find out how quickly they would drain. Unfortunately they didn't drain as quickly as I had hoped, and I had a couple of minutes of water sloshing in the toe area before it all got pushed out.

Perhaps the most impressive thing about the shoes that was evident during this trip is that the wider toe box and overall design of the shoe contributed to it remaining very comfortable through the entire route. I'm inclined to say that at the end of the day my feet were more comfortable in this shoe than they would have been in the Roclite 285.

Update - I have now put over 50 tough miles, including many off-trail alpine miles, on the Trailroc 255s. My overall impression is that I'm definitely a fan of the shoes and I think they're a great fit for some of the tougher mountain terrain. Whether they'll steal my heart away from the Roclite 285s is yet to be seen, but the odds are looking pretty good so far.

Thursday, August 9, 2012

Jupiter Peak Steeplechase - Everything You Still Don't Know About Utah

After injuring my foot at the end of June I took 3 full weeks off from running, then began to slowly ease back into some short low intensity runs in order to make sure I wasn't going to re-aggravate anything. I used my time off from running to partake in some of life's fine alternative pursuits.


People frequently tell me that for whatever reason (or excuse) that they're not cut out to be runners. I've decided that I'm not cut out for a life filled with $0.59 beer and pinkish-tan "meat" products. The time off was refreshing, albeit untimely, but I was definitely ready to be running again in the places that I enjoy most.


The Jupiter Peak Steeplechase, the last race in the 2012 La Sportiva Mountain Cup would be my first true test of how well my foot had healed, and how much my fitness had suffered during the time off. The plan was to leave work Friday afternoon, make the 8 hour drive across southern Wyoming to Park City, UT, then crash for a few hours before getting up for the race Saturday morning. Friday afternoon as I was preparing to leave work, my mom alerted me to the fact that Burger King is now serving bacon sundaes.


Thanks Mom, you're always looking out for me. I immediately began working this new knowledge into my plans for the drive to Park City that evening.


When I got to Rawlins, the sign at the gas station advertising Wyoming wine and sweatshirts was too intriguing to resist, so I went in to check out the local wares and came back out with my very own bottle of genuine Wyoming wine.


With the excitement of my wine purchase still fresh, I made my way to the Burger King across the street and boldly demanded one Bacon Sundae. After being relieved of $2.69, I was given the tasty treat.

It was everything it was advertised to be; specifically, it was a sundae with bacon on it. It was strange. Visually it actually looked pretty good, and the taste was not bad, but the chewy texture of the bacon didn't complement the creamy texture of the ice cream very well. In short, I don't think that this is a treat I'll be developing a craving for again soon.

After leaving Rawlins, I crossed the continental divide, which marked a major milestone in the progress of the trip. The continental divide formed by the Rocky Mountains is an intriguing geographic feature that generally runs along mountainous ridgelines separating the watersheds and basins on either side of the ranges that it runs through. In Colorado specifically, the divide is usually an impressive sight. In southern Wyoming, it is not. In fact, to the untrained eye it is entirely indistinguishable from the rest of the surrounding terrain. When I crossed the divide on I-80 and saw the sign indicating such, I thought it was a joke. Even after I realized that it was not a joke, I still could not fathom how (or why) someone would have put in the effort to determine the exact path of the divide through what amounted to a huge area of high plains with no distinct ridges or valleys.

This is what the continental divide is supposed to look like.


This is not.


Eventually I got to Utah and ran the race. The race was fast; however, I was not. I was beaten by Elvis Presley and some old local dude named Karl who was wearing big fat clown shoes. Rob won the race and saw a moose. I got stung by a bee and got lost. Maybe if I were fast, and Canadian, I would see a moose too.

Utah: it's a real place.

Monday, July 16, 2012

The Allure of the Weminuche - Adventures on the Rio Grande Pyramid

There are a small number of peaks in Colorado that, for one reason or another, have been especially significant in shaping my appreciation for the mountainous areas that I consider my playground. These are not necessarily the highest peaks or those that have the best climbing routes, or are the most scenic. These are the peaks that come to mind first when someone asks me to relate some of my favorite mountain experiences, or when someone asks me why I enjoy spending so much time in the mountains. Many of these special peaks fall well below the much sought-after 14,000' mark and are not peaks that the general mountain climbing community would put on any "must-do" list. Rio Grande Pyramid is one of these peaks.

As the highest peak in the Weminuche Wilderness outside of the Needles and Grenadiers, and one of the 100 highest peaks in Colorado, Rio Grande Pyramid certainly doesn't lack prominence. The somewhat remote location, removed from proximity to high population areas and lacking access by heavily traveled highways, lends itself to relatively low traffic on the peak. On my most recent climb of the peak I only encountered one other party; a group of backpackers camped near Weminuche Pass.

After leaving the Weminuche Creek trailhead and traversing the hillside above the Rio Grande Reservoir for the first mile, the trail turned south along Weminuche Creek and I was suddenly transported into a world of rushing creeks and thriving vegetation. I should clarify that the thriving vegetation was limited mostly to the low-growing plants and the aspen trees, as most of the spruce, fir, and pine trees in the area have been killed off by the bark beetles.


Once above the initial climb up the creek drainage, the expanses of the wide Weminuche Pass valley opened up. Below is the view back down the valley, with bristol head silhouetted in the background.


I left the Weminuche Creek trail and began ascending to the upper reaches of the mountain via the Skyline trail. One large area of the Skyline trail was obscured by deadfall and I followed a small trail that had been formed below the deadfall area, and ended up descending much further than necessary, then had to climb back up to the trail after traversing a very steep grass and gravel slope. My advice for navigating this area is to stay high and try to avoid descending to get around the fallen trees. After returning to the trail, I was quickly rewarded with the first views of Rio Grande Pyramid and The Window below it. The Window is one of the most unique geologic features I've encounted in the mountains and is well worth the effort required to visit it.


The views around me began to open up more and more as I climbed higher on the slopes of the peak, but the view that drew my attention the most was that of The Window, with "Window Peak" above it to the south.


Once on top of the peak, I took my time admiring the views of the mountains in every direction, but especially those mountains directly to the west comprising the Needle and Grenadier ranges.


I descended the peak by way of the westernmost of two large gulleys that drop off the south side of the peak. Either of these gulleys can be descended, and are both filled with loose rocks, but the western gulley appeared to be filled primarily with smaller scree that would provide less of a beating on the feet. In order to gain the best entrance to the western gulley, I recommend descending the southwest ridge of the peak until the gulley can be easily seen below and easy entrance can be obtained. The top of the gulley has some cliffed portions, and attempting to exit the ridge too soon to descend to the gulley may put the climber on top of these cliffs. Once in the chute, the best scree and dirt for descending is found on the far west side.

After descending the gulley and emptying my shoes of all of the dirt and gravel I had collected on my way down, I began the traverse across the high slopes below the ridgeline toward The Window.


After spending a few short minutes resting within The Window, I descended the slopes east to Opal Lake.


The photo below shows the view from opal lake of my descent route from the peak, the slopes traversed to The Window, and the slopes below The Window used to descend to Opal Lake.


From Opal Lake I wandered around a while trying to find the intersection of the Opal Lake Trail with the Rincon La Vaca trail until realizing that the map showed the Rincon La Vaca trail incorrectly. Once headed in the right direction, the Rincon La Vaca trail made a fun descent back to the lower valley above Weminuche Pass. The waterfall below provided a good relief from the rising temperatures during the descent.


Once back to Weminuche Creek, the remaining descent was made quickly and I was soon back at the trailhead.

Unfortunately in the course of this whole adventure I managed to aggrivate an injury of the 1st metatarsal in my left foot, which made the last several miles of the descent fairly painful and has caused me to remain somewhat sedentary for the last couple of weeks. Although the foot seems to be taking its' sweet time in healing, I'm looking forward to future adventures and expect to be back in the mountains with plenty of time to enjoy the remaining summer season.

One other notable takeaway from this adventure is that I am now even further convinced that the Inov8 Roclite 285s are some seriously tough shoes. The beating that my shoes took descending the gulley from the peak would have trashed any other pair of trail running shoes that I own, but the 285s withstood the beating and are no worse for wear. That's on top of the 300+ rough trail miles I already have on that pair. I can only hope that the Trailroc 255s in the new line that inov8 will be releasing soon will be just as durable.


Monday, June 25, 2012

Maroon Bells Four Pass Loop - A Heavy Dose of Mountain Beauty

The Short Version


I've become sensitive to the fact that sometimes I use a lot of words, and that some people don't like reading very many words. For those people, here is a brief synopsis of this trip report: I ran the Maroon Bells Four Pass Loop last Saturday. It was awesome. I swam in three alpine lakes and took over 150 pictures, only 25 of which are uploaded here because the others were too awesome for the internet and would make your monitor explode. I finished the run with a cannon ball into Maroon Lake and ruined some guy's $3000 camera with the splash but that's OK because he was rich so he high-fived me and invited me to the crazy party he was having at his mansion in Aspen that night. I politely declined because I had another crazy mansion party to attend that night, but I told him I'd hit him up the next time I'm in town and we can go buzz around in his Gulfstream or something.

The Real Version


Above my bed I have a print of a painting of the Maroon Bells. In my living room I have a print of a painting of the south side of Snowmass Mountain, Hagerman Peak, and Snowmass Peak. The Elk Mountains are second only to the San Juans in terms of extensive rugged beauty in the Colorado high country, and the heart of the Elk Mountains would be my setting for this adventure. The Maroon Bells Four Pass Loop is a roughly 25 mile route that circumnavigates the Maroon Bells massif, traversing some of the area's most beautiful terrain along the way. As the name implies, the route involves crossing four high alpine passes, all of which top out at approximately 12,500'. Between the passes, the route dips into the alpine and sub-alpine terrain of the separating basins, which during the summer host an abundance of wildflowers and other green vegetation. As Phil Mislinski states in his Trail Runner's Guide to Colorado: "The Four Pass Loop may well be considered the ultimate Colorado trail run."

I pulled into the Maroon Lake trailhead parking lot Friday evening just in time to catch the last light lingering high on the north face of North Maroon Peak. The iconic view of the Bells from Maroon Lake is a sight that never grows old. There is a reason this is the most photographed view in all of Colorado.


The next morning as I began heading up the trail and the sun began to rise, the Bells once again became illuminated, and my eyes were continually drawn to the view.


As I continued up the West Maroon Creek drainage, I felt buried within the deep valley between the Maroon Bells massif and the Pyramid massif. After several miles, the views opened into the upper West Maroon Creek valley and the wide expanses offered great views in all directions.


The hulking mass of Pyramid Peak, Thunder Pyramid, Lightning Pyramid, and Len Shoemaker Ridge loomed over the eastern end of the basin.


Once on top of West Maroon Pass, I stole one last look back toward Belleview Mountain and Maroon Peak.


The first descent of the day into the upper East Fork of the Crystal River Basin was made quickly, and I was soon traversing across the upper basin and began the (relatively) short climb to Frigid Air Pass.


As I climbed higher toward the pass, the views of the high mountains to the southwest grew more spectacular.


As I topped out on Frigid Air Pass and began descending into Fravert Basin and the North Fork of the Crystal River, the greenery around me became almost overwhelming. The best description I have heard of Fravert basin is that it's "So green as to make Ireland envious."


As I followed the North Fork down through the basin, I found myself below treeline for the first time in approximately seven miles. After passing by several small waterfalls, I began to hear the roar of the one I had been waiting for: King Falls.


Because of the routing of the trail, it's difficult to catch a glimpse of the falls until you're well below and across a small basin from them. I determined that I needed to find a route up to the base of the falls. Because both sides of the creek below the falls are choked with thick willows and above those slopes are rocky cliffs, the most feasible route to the base of the falls was to climb up the creek itself. By the time I reached the base, my feet were numb and I was mostly soaked, but it was well worthwhile.


As I began the climb toward Trail Rider pass, the view of Maroon Peak and North Maroon Peak and their connecting ridge came into view, framed above upper Fravert Basin.


This is my attempt at an artsy wildflower shot.


After crossing a high ridge, the final stretch to Trail Rider pass came into view with a small alpine lake below. Of course I had to take this opportunity to stop and go for a swim. The lake was surprisingly warm (and by warm, I mean it was probably at least 40 degrees) and I took my time lounging on the shore after my swim.


Shortly after leaving the high lake, I was greeted by the sentinel of Trail Rider Pass.


Here's a little known marmot fact: marmots are approximately the same size, shape, weight, and structure as a regulation NFL football, which makes them excellent for punting or place-kicking. As an added bonus, they elicit a satisfying squeak upon foot-to-belly impact. After sending the little vermin spiraling neatly into the willows, I made the last steep push up to Trail Rider pass and was instantly rewarded with the views of Snowmass Lake below.


The view of Snowmass Peak and Snowmass Mountain from Snowmass Lake is one of my favorites.


After leaving Snowmass Lake and beginning the last climb of the day to Buckskin Pass, the fatigue of the day began to set in heavily, but I was helped along by the fact that the views behind me of Snowmass Mountain and Capitol Peak became more spectacular the higher I climbed.


After cresting Buckskin pass, I was greeted with perhaps the best views of the day: to the south were the north faces of North Maroon Peak and Sleeping Sexton, and to the east was Pyramid Peak and all of its' sub-peaks.


A nice waterfall in upper Minnehaha Gulch below Buckskin Pass served as my last water refill spot of the day, and I was able to quickly descend back to the lower basin of West Maroon Creek.


After reaching the trail junction at Crater Lake I began the final mile descent back to Maroon Lake, but not before snapping one last photo of the Bells.


This is a tremendously fun route to do as a single day run for someone who is in good shape. It's a tough route, but the beauty of the setting makes the difficulty well worthwhile. I have received varying opinions from people on preferences for doing the route in the clockwise or counter-clockwise direction. For this run I chose the clockwise direction and am glad that I did. No matter what starting point or direction you use for the route, the first climb will be the biggest. By going clockwise I extended the elevation gain of that first climb over more miles, which made for an easier warm up to the day. I have heard (and believe it) that descending West Maroon Pass at the end of the run when going counter-clockwise can be fairly miserable, while the alternative descent from Buckskin Pass only required that I keep my legs moving and let gravity do the work. The only pass that I imagine might be easier going in the counter-clockwise direction is Trail Rider, and even then I believe the benefit would be marginal.

What's left to say about this route? You have to do it for yourself - I guarantee you will not regret it. If you do regret it, just drop-kick a marmot and you'll instantly feel better.